
There are some dinners that just work and for me, these high-protein beef bowls have become the weeknight hero my family actually cheers for. I first threw this together on a chaotic Tuesday when I had about 20 minutes between soccer practice and a looming work deadline. My husband took one bite, looked at me with those “please make this again” eyes, and I knew I’d stumbled onto something special.
What makes these high-protein beef bowls so genius? They’re endlessly customizable, come together faster than takeout delivery, and pack over 40 grams of protein per serving without feeling heavy. The sizzle of lean ground beef hitting a hot pan, the nutty aroma of sesame oil, the satisfying crunch of fresh veggies over warm rice… it’s the kind of meal that feeds your body and your soul.
Whether you’re meal prepping for the week, trying to hit your protein goals, or just want a genuinely delicious bowl that doesn’t taste like “diet food,” this recipe delivers. I’ve tested it at least a dozen times (my kids are very patient taste testers), and I’m finally ready to share every trick I’ve learned.
Why You’ll Love This Recipe
- Seriously high protein without protein powder – Each bowl delivers 45-50g of natural protein from lean beef, edamame, and a secret ingredient (Greek yogurt sauce!). My husband started taking these to work for lunch, and his afternoon energy crashes disappeared.
- Comes together in under 30 minutes – From the first chop to the last garnish, you’re looking at honest-to-goodness fast cooking. I timed myself last week: 27 minutes, including washing the cutting board twice.
- Meal prep superstar – These high-protein beef bowls taste just as good (dare I say better?) on day three. My teenage daughter likes to build her own bowl from separate containers—she prefers her beef extra crispy, so she reheats it alone in a hot skillet.
- One pan for the beef, minimal cleanup – I hate doing dishes with a passion. This recipe uses one large skillet for the protein plus a small pot for rice. That’s it.
- Endlessly customizable – Low-carb? Swap rice for cauliflower rice. Spicy lover? Add sriracha and fresh jalapeños. My mom is dairy-free, so she uses coconut yogurt and leaves off the cheese—still incredible.
- Actually filling, not just “healthy” – I’ve tried those sad desk lunches that leave you hungry an hour later. Not these bowls. The combination of protein, fiber-rich veggies, and complex carbs keeps you satisfied for 4-5 hours.
- Kid-approved and picky-eater friendly – My 7-year-old calls these “taco bowls” and eats them without complaint. I serve the components separately, and she builds her own. Win-win.
Recipe Overview
| Detail | |
|---|---|
| Prep Time | 10 minutes |
| Cook Time | 18 minutes |
| Total Time | 28 minutes |
| Servings | 4 bowls |
| Calories per serving | 545 kcal |
| Cuisine Type | Asian-fusion / American healthy |
| Diet Type | High-protein, can be gluten-free, dairy-free optional |
I typically make these high-protein beef bowls on Sunday afternoon for Monday-Thursday lunches. But honestly? They’ve become our go-to “I don’t know what to cook” dinner at least twice a month.
Ingredients
For the Beef
- 1.5 lbs lean ground beef (90/10 or 93/7 – don’t go higher fat or it gets greasy)
- 3 cloves garlic, minced
- 1 tbsp fresh ginger, grated (I use a microplane – worth every penny)
- 1/4 cup low-sodium soy sauce (or coconut aminos for gluten-free)
- 2 tbsp honey (or brown sugar substitute for low-sugar)
- 1 tbsp rice vinegar
- 1 tsp sesame oil
- 1/2 tsp red pepper flakes (optional, leave out for kids)
For the Bowls
- 2 cups cooked white or brown rice (I prefer jasmine rice – the fragrance is incredible)
- 1 cup shelled edamame, thawed if frozen
- 1 large cucumber, diced
- 1 large carrot, shredded or julienned
- 1 avocado, sliced
- 2 green onions, thinly sliced
- 1 tbsp sesame seeds
For the Creamy Sriracha Sauce (optional but life-changing)
- 1/2 cup plain Greek yogurt (full-fat for creaminess)
- 2 tbsp sriracha (adjust to your heat preference)
- 1 tbsp lime juice
- 1-2 tbsp water to thin
Substitutions I’ve Personally Tested
I know not everyone has the same pantry or dietary needs. Here’s what worked in my kitchen:
- Ground turkey or bison instead of beef – Both work beautifully. Bison is even higher in protein. Just don’t overcook turkey or it turns to sawdust (learned that the hard way).
- Cauliflower rice for low-carb – Sauté it dry in a hot pan for 3-4 minutes to remove excess moisture. Otherwise, your bowl gets soggy.
- Tamari or coconut aminos for gluten-free – Coconut aminos are sweeter, so reduce the honey by half.
- No Greek yogurt? Use mashed avocado + lime juice for a creamy element, or just skip the sauce entirely – the beef is plenty flavorful on its own.
Step-by-Step Instructions
1. Start your rice first
Get your rice cooking immediately. I use a rice cooker because I’m lazy in the best way, but a pot works fine. For jasmine rice: rinse until water runs clear, then 1.5 cups water per 1 cup rice. Bring to a boil, cover, reduce to low, and cook 15 minutes. Don’t peek under the lid – I ruined so many pots of rice by lifting the lid too early.
2. Prep all your fresh veggies while the rice cooks
This is my favorite time-saving tip. Dice the cucumber, shred the carrot, slice the avocado, and chop the green onions. I line everything up in little piles on a cutting board like I’m hosting a cooking show. The smell of fresh ginger and sesame oil starts filling the kitchen at this point, and my kids magically appear asking “what’s for dinner?”
3. Make the sauce (if using)
In a small bowl, whisk together Greek yogurt, sriracha, lime juice, and 1 tablespoon of water. Add more water until it’s drizzle-consistency. Taste it – I always add an extra squeeze of lime because I love bright, tangy flavors. Set aside.
4. Brown the beef with aromatics
Heat a large skillet over medium-high heat. Add the ground beef and break it apart with a wooden spoon. *Here’s the trick I learned the hard way: don’t move the beef constantly. Let it sit for 60-90 seconds to get a real sear. That brown crust equals flavor.* When the beef is about 80% cooked (still a little pink), add the minced garlic and grated ginger.
The moment that garlic and ginger hit the hot pan? Stop what you’re doing and just breathe. That warm, spicy, slightly sweet aroma is the smell of dinner done right.
5. Add the sauce to the beef
Once the beef is fully browned (no pink left), drain any excess fat if needed. My 93/7 beef usually doesn’t need draining, but 80/20 would. Return the pan to medium heat and add soy sauce, honey, rice vinegar, sesame oil, and red pepper flakes. Stir everything together and let it bubble for 2-3 minutes until the liquid reduces slightly and coats the beef like a glossy blanket.
You’ll hear it – that thick, happy simmer sound. The beef transforms from “browned meat” into something sticky, savory-sweet, and deeply satisfying.
6. Assemble your bowls
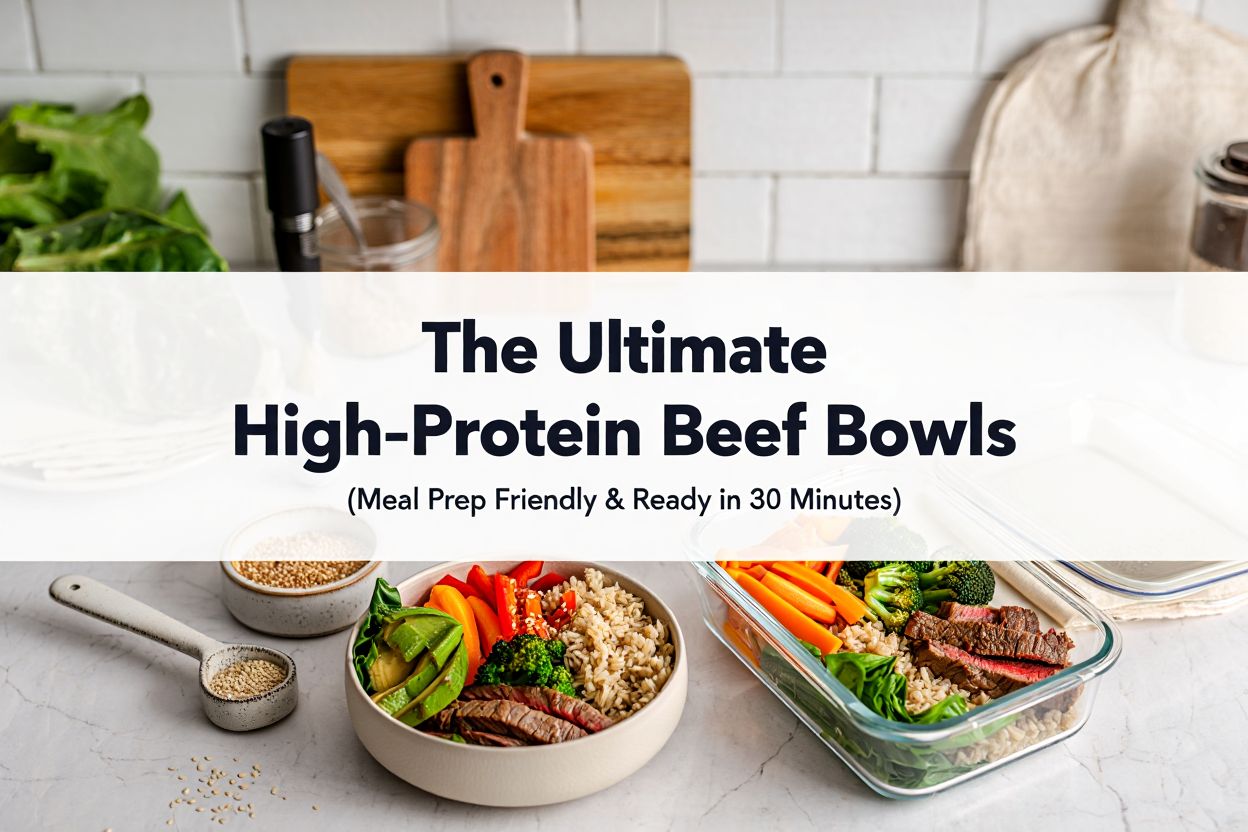
Divide the cooked rice among four bowls. Top each with the beef mixture. Arrange the edamame, cucumber, shredded carrot, and avocado around the beef like you’re making edible art (or just pile it all on – no judgment here).
7. Garnish and serve
Sprinkle with green onions and sesame seeds. Drizzle the creamy sriracha sauce over everything. Serve immediately while the beef is still warm and the avocado is perfectly cold – that temperature contrast is chef’s kiss.
Pro Tips for Perfect Results
Don’t overcrowd the pan when browning beef. I once tried doubling this recipe in the same skillet. The beef steamed instead of seared, and the whole batch tasted bland and gray. If you’re doubling, use two pans or cook in batches.
Let the sauce reduce properly. That sticky glaze doesn’t happen instantly. Be patient for 2-3 minutes. You’ll know it’s ready when you drag your spoon through the pan and see the bottom for a second before liquid fills it back in.
Season in layers. The soy sauce brings salt, but I also add a tiny pinch of black pepper to the beef while it browns. Small thing, big difference.
Rice temperature matters. I like to serve the beef hot over room-temperature or slightly warm rice. If the rice is piping hot straight from the cooker, it wilts the cucumber too fast. If you meal prep, reheat the beef separately and add it to cold rice – the contrast is delightful.
My biggest mistake (so you don’t repeat it): The first time I made this, I forgot to drain the beef fat before adding the soy sauce mixture. The sauce never thickened – just swam in a greasy pool. Now I always tip the pan and sop up excess fat with a paper towel held by tongs.
Variations & Add-Ons
Spicy Korean-Style Bowl – Add 2 tbsp gochujang (Korean chili paste) with the soy sauce mixture. Use kimchi as a topping instead of cucumber. My husband begs for this version weekly.
Low-Carb / Keto Bowl – Swap rice for 4 cups of chopped romaine or butter lettuce. Double the edamame for extra bulk. Use sugar-free honey substitute or omit the honey entirely – the beef still tastes great.
Teriyaki Beef Bowl – Replace the soy sauce mixture with 1/3 cup bottled teriyaki sauce plus 1 tbsp water. Skip the sesame oil (most teriyaki has it already). This is what I make for my kids when they want “the sweet one.”
Mediterranean Twist – I tried this on a whim and was shocked how good it was. Use ground lamb instead of beef. Top with cucumber, tomato, red onion, feta cheese, and tzatziki. Skip the Asian sauces and season the meat with oregano, garlic, and lemon.
Extra Veggie Loaded – Add roasted broccoli, sautéed bell peppers, or steamed bok choy. I often throw in a handful of baby spinach at the end of cooking the beef – it wilts in 30 seconds and adds iron without changing the flavor much.
My personal favorite variation: Half sriracha sauce, half extra avocado. I’m an avocado fiend. There’s something about the creamy cool fat against the sticky savory beef that makes me happy-cry a little.
Storage and Meal Prep Tips
Fridge storage: Keep components separate for best results. Store beef in one airtight container, rice in another, veggies in a third. The beef stays good for 4 days. Veggies (except avocado) last 3-4 days.
Freezing instructions: The beef mixture freezes beautifully for up to 3 months. Rice also freezes well. Do NOT freeze cucumber, avocado, or the yogurt sauce – they’ll turn into a sad, watery mess.
Best reheating method: For the beef – reheat in a hot skillet with a splash of water for 2-3 minutes. The microwave works but the texture loses that crispy edge. For rice – sprinkle with water and microwave covered with a damp paper towel.
My meal prep routine: Every Sunday, I cook a double batch of beef and rice. I portion them into 8 glass containers. Each morning, I grab one, add fresh cucumber and avocado (I cut these fresh daily – takes 2 minutes), and drizzle sauce from a small jar. Five days of lunches, zero morning stress.
Pro tip from my kitchen: Store your green onions in a glass with an inch of water on the counter. They regrow for weeks. I haven’t bought green onions in almost two months.
FAQ Section
Can I use ground chicken or turkey instead of beef?
Absolutely! I tested this with ground turkey last month. The biggest difference is moisture – turkey dries out faster. Cook it just until no longer pink, about 6-7 minutes total. Add an extra tablespoon of oil to the pan first.
How do I make these high-protein beef bowls dairy-free?
Super easy. Swap the Greek yogurt sauce for a dairy-free version using coconut yogurt or a simple tahini sauce (2 tbsp tahini, 2 tbsp lemon juice, water to thin). Or just skip the sauce entirely – the beef glaze is plenty flavorful on its own.
What’s the protein count per serving?
Each bowl contains 45-50g protein depending on your beef and toppings. Here’s the breakdown: beef (35g), edamame (8g), Greek yogurt sauce (4g), rice (3g). That’s more than half the daily recommendation for most adults in one delicious bowl.
Can I make this vegetarian?
Yes, but it won’t be “beef” bowls anymore. I’ve made a vegetarian version using crumbled extra-firm tofu or plant-based ground. Cook the tofu until crispy, then toss in the same sauce. Add roasted chickpeas for extra protein. My vegetarian niece said it was “actually good” – high praise from a 14-year-old.
Why is my beef sauce watery instead of thick and sticky?
Two common culprits. First, you didn’t drain excess fat before adding the sauce – fat prevents the sauce from adhering. Second, you didn’t let it simmer long enough. Give it a full 3 minutes of bubbling over medium heat. The liquid will reduce and thicken naturally.
Conclusion (Let’s Eat!)
These high-protein beef bowls have genuinely changed how my family eats on busy nights. No more sad drive-thru burgers or leftover mystery casseroles. Just real, satisfying food that tastes incredible and fuels your body right.
I’d love to hear how they turn out in your kitchen. Did you try the spicy Korean version? Did your kids build their own bowls? Did you discover a topping combo I haven’t thought of? Drop a comment below – I read every single one and answer questions within 24 hours.
And if you’re meal prepping these for the week? Tag me in your photos. There’s nothing that makes me happier than seeing my recipes come to life in your kitchens.
Now go make some noise with that sizzling beef. Your kitchen is about to smell incredible.
Happy cooking,
Joanna
For more authentic recipes : duarecipes