
I still remember the first time I brought a platter of easy pinwheel recipes to a family gathering. My aunt, who is famously picky, raised an eyebrow at the little spirals. Then she took a bite of the Chicken Bacon Ranch one. Two minutes later, she was hovering over the plate, “accidentally” taking another. And another.
That’s the magic of pinwheels. They look fancy, but they are ridiculously simple to throw together. Whether I’m packing my son’s lunchbox, hosting a last-minute game day hangout, or just need a high-protein snack for myself, these easy pinwheel recipes never let me down.
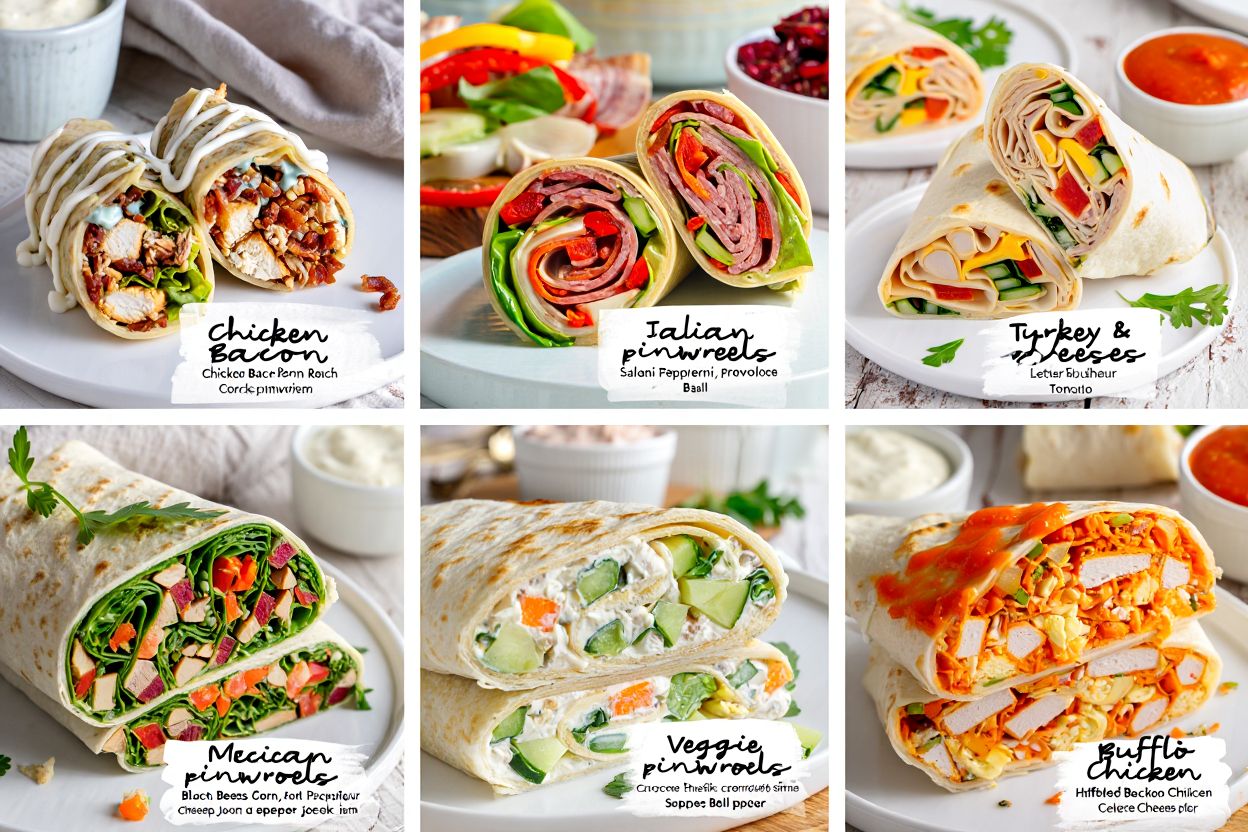
Over the years, I have tested every combination imaginable. I’ve made the tortillas too soggy (lesson learned: cream cheese is your protective barrier). I’ve over-rolled until the fillings squished out the sides (don’t do it). Today, I am sharing my six absolute best versions: Chicken Bacon Ranch, Italian, Turkey & Cheese, Mexican, Veggie, and Buffalo Chicken. Get your cutting board ready the smell of crispy bacon and fresh herbs is about to fill your kitchen.
Why You’ll Love These Easy Pinwheel Recipes
- Unbelievably fast. From pulling ingredients out of the fridge to slicing the final roll, you are looking at 15 minutes tops. My husband jokes that I “cook” faster than he can order takeout.
- Perfect for every occasion. I bring these to soccer practice, birthday parties, and even Christmas Eve dinner. They somehow look elegant enough for adults but fun enough for kids.
- No oven required. On a hot July afternoon, the last thing I want to do is turn on the oven. These stay cool, creamy, and refreshing.
- My kids actually fight over them. Last week, my daughter specifically requested the Veggie Pinwheel (shocked me, too). She prefers hers with extra cucumber, while my son demands double salami on the Italian version.
- Meal prep hero. I make a batch on Sunday night, and we have grab-and-go lunches for three days. That’s one less thing to worry about on a busy Tuesday morning.
- Endlessly customizable. You are basically an artist with a tortilla canvas. Swap meats, use leftover rotisserie chicken, or go full vegetarian. I’ll show you how.
Recipe Overview
| Detail | Information |
|---|---|
| Prep Time | 15 minutes (per 3-4 pinwheels) |
| Cook Time | 0 minutes (no cooking required!) |
| Total Time | 15 minutes + 30 minutes chilling |
| Servings | 24 pinwheels (4 of each flavor) |
| Calories per serving | Approx. 110-150 per pinwheel (varies by flavor) |
| Cuisine Type | American / Tex-Mex / Italian |
| Diet Type | Can be made low-carb (use low-carb tortillas) or vegetarian |
I usually make these on Sunday afternoons while listening to a podcast. The chilling time is the most important secret don’t skip it, or you’ll have sad, unrolled spirals like I made my first time.
Ingredients
Here is everything you need for all six flavors. I’ve organized it by pinwheel type so you can pick and choose.
For the Chicken Bacon Ranch Pinwheels
- 2 large (10-inch) flour tortillas
- 1 cup cooked chicken, finely diced (rotisserie chicken works great)
- 4 slices crispy bacon, crumbled
- 4 oz cream cheese, softened
- 2 tbsp ranch dressing
- ½ cup shredded cheddar cheese
- 1 tbsp fresh chives, minced (optional)
For the Italian Pinwheels
- 2 large flour tortillas
- 4 oz cream cheese, softened
- 6 slices deli ham
- 6 slices salami
- 4 slices provolone cheese
- ¼ cup chopped black olives
- ¼ cup sliced roasted red peppers (drained and patted dry)
For the Turkey & Cheese Pinwheels
- 2 large flour tortillas
- 4 oz cream cheese, softened
- 8 slices roasted turkey breast
- 4 slices Swiss or cheddar cheese
- 2 tbsp Dijon mustard (or plain yellow)
- ¼ cup shredded lettuce (add just before rolling)
For the Mexican Pinwheels
- 2 large flour tortillas
- 4 oz cream cheese, softened
- ½ cup cooked taco-seasoned ground beef or shredded chicken
- ¼ cup salsa, drained (so it doesn’t get wet)
- ½ cup shredded Mexican blend cheese
- ¼ cup sliced black olives
- 2 tbsp chopped fresh cilantro
For the Veggie Pinwheels
- 2 large flour tortillas
- 4 oz cream cheese, softened
- ¼ cup finely shredded carrot
- ¼ cup thinly sliced cucumber (pat dry)
- ¼ cup thinly sliced red bell pepper
- 2 tbsp chopped fresh dill or parsley
- ¼ cup crumbled feta cheese (optional but amazing)
For the Buffalo Chicken Pinwheels
- 2 large flour tortillas
- 1 cup shredded cooked chicken
- ¼ cup buffalo wing sauce (I like Frank’s RedHot)
- 4 oz cream cheese, softened
- ½ cup shredded cheddar cheese
- 2 tbsp minced green onions (green parts only)
Substitution Note: I have personally tested low-carb tortillas for all of these. They work perfectly, though they are slightly less pliable. If you go that route, microwave them for 10 seconds before spreading. For a dairy-free option, my sister uses Kite Hill chive cream cheese—it spreads beautifully.
Step-by-Step Instructions (The Master Method)
I follow the same basic technique for every batch. Once you learn this “foundation” method, you can make any pinwheel imaginable.
1. Soften your cream cheese.
Do not skip this. I learned the hard way that cold, stiff cream cheese rips tortillas like a paper shredder. Leave it on the counter for 30 minutes. Or, microwave it for 15 seconds. You want it the texture of fluffy frosting.
2. Set up your assembly line.
Lay one tortilla flat on a clean cutting board. I always use a damp paper towel underneath to stop it from sliding around. Have all your fillings pre-chopped and within reach.
3. Spread the base layer.
Using an offset spatula or the back of a spoon, spread a thin, even layer of softened cream cheese all the way to the edges of the tortilla. This is your “glue” and your “moisture barrier.” It stops the juicy ingredients (like salsa or peppers) from soaking into the tortilla and making it soggy.
4. Layer your fillings logically.
Here is my golden rule: Meats first, then cheese, then veggies, then dry toppings (like bacon bits or olives).
For example, with the Chicken Bacon Ranch: Lay the diced chicken over the cream cheese, sprinkle with bacon crumbles, then the cheddar, and finally a drizzle of ranch. Don’t overstuff you want about ¼ inch thickness. The first time I made these, I used double the filling and ended up with a burrito explosion. Less is more.
5. Roll it tight, but not too tight.
Starting at the edge closest to you, tightly roll the tortilla away from you, keeping even pressure. But don’t squeeze like you’re wringing a towel. You’ll hear a little squish sound if you overdo it. That’s the filling pushing out. Stop short of that.
6. Wrap and chill (the most important step).
Wrap each rolled tortilla tightly in plastic wrap. Twist the ends like a candy wrapper. Place them seam-side down in the fridge for at least 30 minutes. I often do 2 hours. This allows the cream cheese to re-firm and “glues” the roll into perfect spirals.
7. Slice with a sharp, non-serrated knife.
Once chilled, unwrap and place on your board. Use a sharp chef’s knife (a bread knife will crush them). Wipe the blade clean between every cut. Slice each roll into 1-inch pinwheels. You’ll get about 8-10 per tortilla.
8. Arrange and serve immediately.
I love arranging them on a white platter in a spiral pattern. The colors from the roasted red peppers, green onions, and carrots look like a mosaic. Serve cold or at room temperature.
Pro Tips for Perfect Pinwheels
- The “Paper Towel Trick” for wet ingredients. If you use salsa, olives, or roasted peppers, press them between two paper towels before adding. Excess moisture equals soggy tortillas. I once ruined an entire batch of Mexican pinwheels by using wet salsa straight from the jar. Never again.
- Don’t use pre-shredded cheese for the cream cheese mix. Pre-shredded cheese has anti-caking agents (cellulose powder) that make the texture gritty. Grate your own block cheddar—it melts (or in this case, blends) so much better.
- The knife wipe rule. Between each slice, wipe your knife with a damp cloth. This prevents the cream cheese from smearing across the beautiful spiral pattern. My food photography got 10x better when I started doing this.
- If your tortilla cracks, steam it. I learned this from making taquitos. If your tortilla feels stiff or cracks when rolling, microwave it between two damp paper towels for 10 seconds. It becomes flexible like ribbon.
Variations & Add-Ons
Spicy Kick: Add 1 tbsp of sriracha to the cream cheese in the Buffalo Chicken recipe. Or, throw in a few slices of pickled jalapeños to the Mexican version. My husband loves it so spicy his eyes water. Me? I stick to mild.
Low-Carb / Keto: Use Mission Carb Balance tortillas (only 4g net carbs). Replace the cream cheese with a dairy-free version if needed. Load up on extra meats and cheese. The Turkey & Cheese version works beautifully for keto.
Breakfast Pinwheels: This isn’t in the main list, but my family asks for these on camping trips. Scramble 4 eggs, crumble breakfast sausage, and mix with cheddar and cream cheese. Roll exactly the same way. Serve warm. Unreal.
My personal favorite. If you forced me to choose one, it’s the Italian Pinwheels. Something about the salty salami, the briny olives, and the sweet roasted red peppers exploding in one bite—it tastes like a deli sandwich but in a fun, portable shape. I always make a double batch of that one.
Storage and Meal Prep Tips
Refrigerator: Store sliced pinwheels in an airtight container layered between parchment paper. They stay fresh for up to 4 days. The Veggie and Buffalo versions hold up best. The Italian ones sometimes get a little oily by day 4 (still delicious, just softer).
Freezer: I do not recommend freezing fully assembled pinwheels. The cream cheese becomes grainy and the vegetables weep water when thawed. However! You can freeze the rolled, un-sliced logs for up to 2 months. Wrap tightly in plastic + foil. Thaw in the fridge overnight, then slice.
My meal prep routine: Every Sunday, I make 4 logs (one of each flavor my kids like). I wrap them in plastic, label them with a sharpie, and stack them in the fridge. Each morning, I slice only what I need for lunches that day. This keeps the rest fresher longer. It’s a tiny habit that saved my lunch-packing sanity.
Best reheating (if you want them warm): Place pinwheels on a baking sheet. Cover with foil. Warm at 300°F for 5-7 minutes. Do not microwave unless you enjoy rubbery tortillas. I speak from sad, chewy experience.
FAQ Section
Can I make pinwheels a day ahead of a party?
Absolutely. In fact, I recommend it. Make the rolls, wrap them tightly, and store them in the fridge whole (don’t slice). Slice them about 2 hours before your guests arrive. This prevents the cut edges from drying out. I do this for every Super Bowl party I host.
Why are my pinwheels soggy?
Two culprits: wet ingredients and skipping the chilling step. Always pat olives, peppers, and cucumbers dry. And never slice a warm roll. The cream cheese needs that 30+ minutes in the fridge to solidify and act as a moisture barrier. Trust the chill time.
Can I use spinach or sun-dried tomato tortillas?
Yes, and they look gorgeous. Spinach tortillas turn the Italian pinwheels a festive green. Tomato tortillas work beautifully with the Buffalo Chicken. Just know that flavored tortillas are sometimes thinner, so be extra gentle when spreading the cream cheese.
What’s the best knife for slicing clean pinwheels?
A sharp, straight-edged chef’s knife or a serrated bread knife. But the real secret is to wipe the blade clean with a damp paper towel after every slice. That one tip changed my pinwheel game completely. No more smeared fillings.
Conclusion (Let’s Make These Together!)
I honestly believe that every home cook needs a few easy pinwheel recipes in their back pocket. They are the ultimate life hack for busy weeks, hungry kids, and surprise guests. The first time you pull a beautiful, colorful platter out of the fridge and watch everyone’s face light up that feeling never gets old.
Try one flavor this week. Or try all six. Let me know which one becomes your family’s favorite. Drop a comment below with your own twists (my readers love hearing how you make recipes your own). And if you take a photo, tag me I love seeing your kitchen wins.
Now go soften that cream cheese. Your tortillas are waiting.
Happy rolling, friends!
For more authentic : duarecipes