
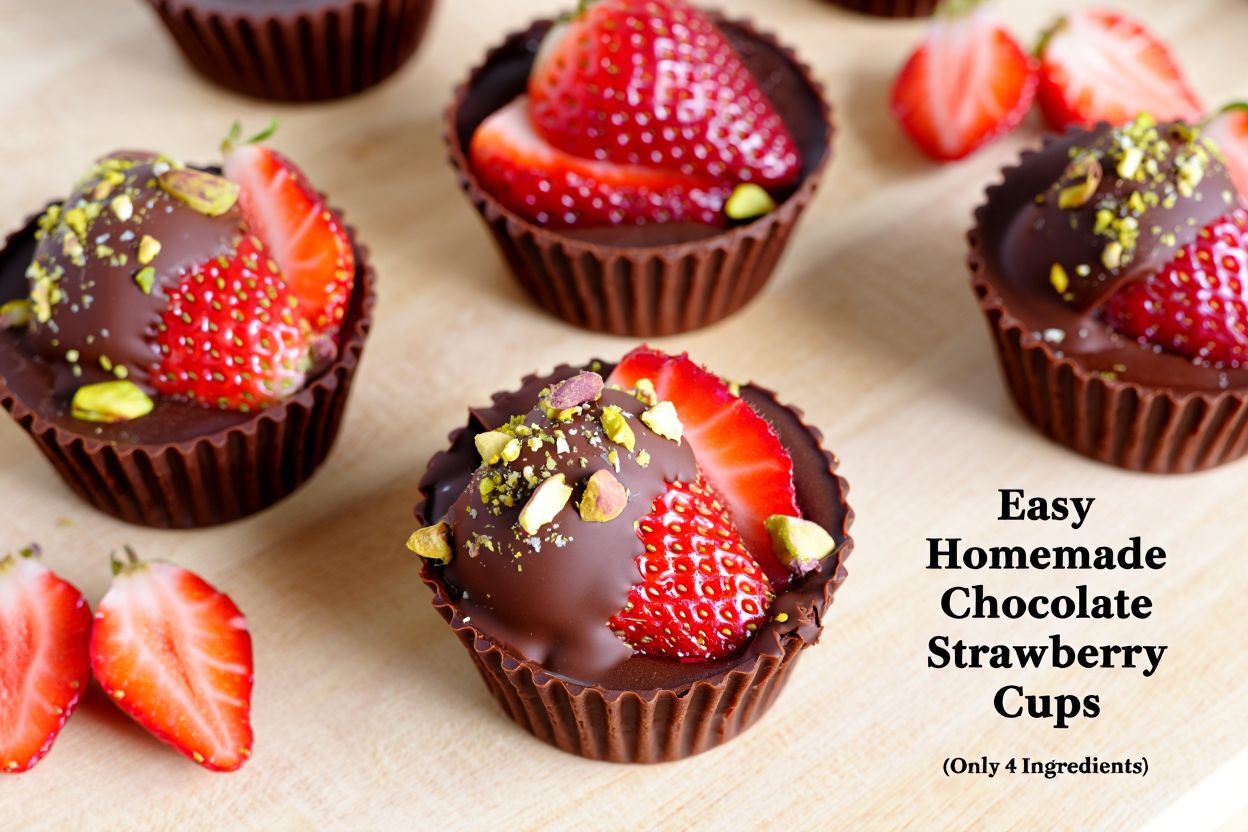
There’s something magical about biting into a chocolate strawberry cup that first crack of the firm chocolate shell giving way to a burst of juicy, sweet strawberry inside. I first stumbled upon this idea one summer when I had an overflow of ripe strawberries from our local pick-your-own farm and a half-empty bag of chocolate chips staring at me from the pantry.
These little beauties have become my secret weapon for last-minute gatherings, holiday dessert tables, and even those “I need something sweet but don’t want to turn on the oven” weekday cravings. What I love most about this chocolate strawberry cup recipe is how ridiculously simple it is. No baking, no complicated techniques, and honestly? They look way more impressive than the effort suggests.
I’ve tested this recipe at least a dozen times (my family happily volunteered as taste testers), tweaking the chocolate-to-strawberry ratio, trying different molds, and figuring out the little tricks that take these from good to unforgettable. Today, I’m sharing everything I learned so you can nail them on your first try.
Why You’ll Love This Recipe
- Only 4 basic ingredients – You probably already have most of them in your kitchen right now. No weird specialty items or expensive equipment.
- No baking required – Perfect for hot summer days when turning on the oven feels like a punishment. These come together entirely in the fridge or freezer.
- Naturally gluten-free and easily vegan – They work for almost everyone. I’ve served these at parties where guests had multiple dietary restrictions, and every single cup disappeared.
- My kids call them “fancy chocolate bombs” – The first time my daughter tried one, her eyes went wide and she whispered, “Mom, these taste like a fancy chocolate shop made them.” That’s the moment I knew I had to write down the recipe.
- Make-ahead friendly – They store beautifully for weeks in the freezer, which means you can prep a big batch and pull them out whenever company shows up unannounced.
- Endlessly customizable – Once you master the basic technique, you can swap in different fruits, add toppings, or play with flavored chocolate. I’ll show you how.
Recipe Overview
| Category | Details |
|---|---|
| Prep Time | 15 minutes |
| Chilling Time | 30 minutes |
| Total Time | 45 minutes |
| Servings | 12 cups (1 per serving) |
| Calories per serving | Approximately 110-130 calories |
| Cuisine Type | American / No-Bake Dessert |
| Diet Type | Gluten-Free, Vegetarian (Vegan option available) |
I usually make these on Sunday afternoons when the kitchen is quiet and I have a little time to myself. There’s something meditative about melting chocolate and carefully spooning it into each mold. Plus, having a batch ready in the freezer means I’m always prepared for unexpected sweet tooth attacks.
Ingredients
For the Cups:
- 12 medium fresh strawberries – Look for firm, ripe berries with bright green tops. Not too soft or mushy.
- 1 cup (170g) dark chocolate chips or chopped chocolate – I recommend 60-70% cacao for the perfect balance of richness without bitterness.
- 1 tablespoon coconut oil – This is my secret for that professional, glossy snap when you bite into a chocolate strawberry cup.
For the Optional Topping (Highly Recommended):
- Flaky sea salt – Just a pinch per cup. The salty-sweet combo is incredible.
- Freeze-dried strawberry powder – Made by pulverizing freeze-dried strawberries in a food processor. Adds beautiful color and extra strawberry punch.
- White chocolate drizzle – About ¼ cup melted white chocolate chips.
Substitutions I’ve Personally Tested:
Coconut oil alternatives: You can use cocoa butter (even better for snap, but harder to find) or refined avocado oil. Avoid butter it contains water and can cause the chocolate to seize. I learned this the hard way during my third test batch when my chocolate turned grainy and thick.
Chocolate options: Milk chocolate works beautifully if you prefer sweeter cups, but reduce or skip the sweetened toppings. White chocolate is also delicious but behaves slightly differently reduce coconut oil to 2 teaspoons since white chocolate is softer.
Strawberry swaps: When strawberries aren’t in season, I’ve used raspberries, blackberries, and even small cubes of mango. Each gives a different experience, but the technique stays exactly the same.
Step-by-Step Instructions
1. Prep Your Strawberries
Wash your strawberries gently under cool water and pat them completely dry with paper towels. This is critical any residual water will make your chocolate seize and turn grainy. I always lay them out on a clean kitchen towel for 10 minutes after drying, just to be absolutely sure.
Remove the green tops using a paring knife or strawberry huller. My husband prefers the cups with the stems left on for easy grabbing (like a chocolate strawberry lollipop), so sometimes I leave them intact. Try both and see what your family likes better.
2. Prepare Your Molds
Line a mini muffin tin with 12 paper liners, or use silicone mini muffin cups (my personal favorite nothing sticks to silicone). If using a metal tin without liners, lightly grease each cup with a tiny dab of coconut oil.
When I first tested this recipe, I thought I could skip the liners and just pop the cups out. Let’s just say I spent 20 minutes with a butter knife and some very strong language. Use the liners. Trust me.
3. Melt the Chocolate
Place your chocolate chips and coconut oil in a microwave-safe bowl. Microwave in 20-second intervals, stirring thoroughly between each, until smooth and fully melted. This usually takes 3-4 intervals for me.
The sound of success: When you stir melted chocolate properly, you’ll hear a soft, silky whisper against the bowl no clumps, no scraping. That’s how you know it’s perfect.
Alternatively, use a double boiler on the stovetop: simmer water in a small pot, place a heatproof bowl on top (not touching the water), and stir until melted. This method takes longer but gives you more control.
4. Coat the Bottoms and Sides
Spoon about 1 teaspoon of melted chocolate into each liner. Using the back of your spoon or a small pastry brush, push the chocolate up the sides of the liner until you have a thin, even coating on the bottom and walls. The chocolate should come about ¾ of the way up the liner.
Don’t rush this step like I once did I tried to make the walls too thick, which left no room for the strawberry. Aim for thin but sturdy. If you see light through the chocolate, you’re in the perfect zone.
5. First Chill
Place the muffin tin in the refrigerator for 10-15 minutes, until the chocolate is completely firm to the touch. You’ll know it’s ready when the chocolate looks matte rather than shiny and doesn’t smear when you tap it gently.
6. Add the Strawberries
Remove the tin from the fridge. Place one strawberry upright inside each chocolate cup, pressing down gently so it settles into the bottom. The strawberry should sit snugly with its tip pointing up.
This is where the magic happens the contrast between the cold, firm chocolate and the room-temperature strawberry is absolutely perfect. My daughter always tries to sneak one at this stage.
7. Seal the Cups
Spoon another ½ teaspoon of melted chocolate over the top of each strawberry, letting it drip down the sides slightly. Use the back of your spoon to gently push the chocolate so it meets the bottom layer and creates a complete seal around the fruit.
For an extra-generous chocolate coating (my husband’s preference), use a full teaspoon here and swirl the cup gently to distribute.
8. Add Toppings (Optional but Wonderful)
If using flaky sea salt or crushed freeze-dried strawberries, sprinkle them on immediately after adding the top chocolate layer before the chocolate sets. The toppings will stick beautifully to the wet chocolate.
For white chocolate drizzle, wait until the cups are fully set (next step), then melt white chocolate and use a fork to flick it back and forth over the cups.
9. Final Chill
Return the tin to the refrigerator for another 15-20 minutes, or until the top layer is completely firm. If you’re in a hurry (I’ve definitely been there), the freezer works in 10 minutes flat.
10. Serve or Store
Peel away the paper liners and arrange your chocolate strawberry cups on a serving platter. The first bite should deliver a satisfying snap, followed by the juicy, fresh burst of strawberry. That texture contrast? Pure heaven.
Pro Tips for Perfect Results
Use room-temperature fruit. Cold strawberries straight from the fridge can cause the warm chocolate to seize and crack. Let your berries sit on the counter for 20 minutes before starting. I forgot this once and ended up with cloudy, cracked chocolate cups that looked like a science experiment gone wrong.
Don’t overheat your chocolate. Chocolate is temperamental. If it gets above 90-95°F (32-35°C) for dark chocolate, the cocoa butter separates and you’ll get a greasy, grainy mess. When microwaving, stop while a few small chips are still visible and stir residual heat will melt them.
Work in small batches. Melted chocolate starts to thicken as it cools. If it becomes too stiff to work with, reheat for 5 seconds and stir vigorously. Never add liquid (water, milk, cream) to thin it that causes seizing.
Create thicker walls by double-coating. For sturdier cups that travel well, apply the first chocolate layer, chill for 5 minutes, then add a second thin layer before the final chill. This is my trick for bringing these to potlucks.
The liner trick: If your paper liners stick to the chocolate, peel them while the cups are still cold. Let them sit at room temperature for 1-2 minutes, then peel from the bottom up. Stubborn liners? Pop the cup in the freezer for 5 minutes—the chocolate contracts slightly and releases the paper.
Variations & Add-Ons
Raspberry Dark Chocolate Cups: Replace strawberries with fresh raspberries. They’re more delicate, so handle gently. The tartness of raspberries paired with 70% dark chocolate is my personal favorite variation.
Peanut Butter Chocolate Strawberry Cups: Add ¼ teaspoon of peanut butter to the bottom of each cup before the first chocolate layer. The salty peanut flavor with sweet strawberry is incredible. My family fights over these ones.
Vegan Chocolate Strawberry Cups: Use vegan dark chocolate chips (most dark chocolate is naturally vegan—check the label) and coconut oil. That’s it. No other changes needed.
Spicy Aztec Cups: Add a pinch of cayenne pepper and ground cinnamon to your melted chocolate. The subtle heat builds slowly and makes the strawberry taste even sweeter in contrast.
Holiday Sprinkle Cups: For Christmas or Valentine’s Day, add red and white sprinkles or crushed candy canes to the wet chocolate tops. They look festive and add a fun crunch.
Which one do I prefer? On a normal Tuesday, I make the basic version with flaky sea salt. But for special occasions, the peanut butter variation disappears faster than anything else I’ve ever made.
Storage and Meal Prep Tips
Refrigerator: Store finished cups in an airtight container with parchment paper between layers. They’ll keep for up to 5 days, though the strawberries will soften slightly over time. I actually prefer them on day 2 the chocolate absorbs a hint of strawberry juice.
Freezer: These freeze beautifully for up to 3 months. Arrange cups in a single layer on a baking sheet, freeze for 1 hour until solid, then transfer to a freezer bag. This prevents them from sticking together.
Best way to reheat/thaw: Eat them straight from the freezer for a firmer, candy-like texture. Or let them sit at room temperature for 10 minutes for a softer strawberry center. Never microwave you’ll create a melted disaster.
My kitchen routine: I make a triple batch of these chocolate strawberry cups at the beginning of strawberry season and keep a freezer bag stocked. When guests come over unexpectedly, I pull out a few, arrange them on a nice plate, and everyone thinks I spent hours prepping. Our little secret.
FAQ Section
Can I use frozen strawberries for chocolate strawberry cups?
I don’t recommend it. Frozen strawberries release too much water as they thaw, which makes the chocolate shells soft and weepy. Fresh, firm berries give you that perfect juicy burst. Save frozen berries for smoothies.
Why did my chocolate turn thick and grainy?
That’s called seizing—it happens when moisture touches melting chocolate. A single drop of water from a wet strawberry or damp bowl can cause it. Always dry fruit and utensils completely. If it seizes, you can sometimes save it by stirring in 1 teaspoon of coconut oil per ½ cup chocolate.
How far in advance can I make these for a party?
You can make them up to 5 days ahead and store in the fridge, but I find the texture is best within 48 hours. For the absolute freshest taste, make the shells up to a week ahead (stored in an airtight container) and add the strawberries and top layer the morning of your event.
Can I make these without coconut oil?
Yes, but the texture changes. Coconut oil keeps the chocolate fluid for dipping and adds that glossy snap. Without it, the chocolate will be thicker and more prone to cracking. I’ve used refined avocado oil successfully use the same 1 tablespoon amount.
Are these healthy enough for a snack?
With dark chocolate (antioxidants) and fresh strawberries (vitamin C), these are certainly better than a candy bar. At around 120 calories each with minimal added sugar (depending on your chocolate choice), I happily give these to my kids as an after-school treat.
Conclusion
These chocolate strawberry cups have saved me more times than I can count from last-minute dinner parties to holiday dessert swaps to simply needing a little joy on a random Wednesday afternoon. They’re proof that the best recipes don’t need to be complicated or time-consuming.
I’d love to hear how yours turn out! Drop a comment below and let me know which variation you tried, or share a photo of your cups on Pinterest and tag me. Did you add a twist I haven’t thought of? Tell me about it I’m always looking for new ideas.
Now go grab those strawberries and that chocolate. Your future self (and everyone you share these with) will thank you.
Happy cooking, friends! 🍓
For authentic recipes : duarecipes