
Some desserts are delicate. Some are fancy. And then there’s kunafa a glorious, messy, crunchy-on-the-outside, gooey-on-the-inside masterpiece that doesn’t ask for permission. It demands attention.
If you’ve ever walked past a Middle Eastern bakery and seen that golden, shredded pastry glistening with syrup and topped with bright green pistachios, you know exactly what I mean. Kunafa (also spelled knafeh, kunafeh, or kanafeh) is the crown jewel of Eid celebrations, family gatherings, and late-night sweet cravings.
This recipe is for anyone who wants to make restaurant-quality kunafa at home without special equipment or hard-to-find skills. You don’t need to be a pastry chef. You just need patience, a good oven, and the willingness to embrace buttery, cheesy happiness.
By the end of this post, you’ll know exactly how to layer, bake, and serve kunafa that stays crispy on the bottom, creamy in the middle, and perfectly sweet on top.
Why This Recipe Works
Let’s talk about what makes kunafa work because it’s not magic, it’s simple food science.
First, kunafa dough (shredded phyllo or kataifi) is naturally dry and thread-like. It crisps up beautifully when mixed with melted butter and baked at high heat. The butter coats each strand, allowing them to toast evenly without burning.
Second, the layering order matters. A thin layer of dough at the bottom creates a crunchy base. The creamy cheese layer in the middle stays soft and melts into long, stretchy strings. A second layer of dough on top protects the cheese and turns golden brown.
Third, the syrup is poured after baking not before. This is critical. If you pour syrup before baking, the dough absorbs too much liquid and turns soggy. By pouring it warm over hot kunafa, the pastry drinks just enough syrup to stay moist on top while remaining crackly underneath.
The rosewater and lemon in the syrup aren’t just for flavor. Lemon prevents the sugar syrup from crystallizing. Rosewater adds that signature floral note that separates authentic kunafa from a generic sweet pastry.
Finally, baking at 180°C (350°F) for 35 minutes is the sweet spot. Hot enough to melt the cheese completely and brown the dough, but not so hot that the syrup burns when added later.
Ingredients
Here’s what you’ll need, plus why each one matters.
For the sugar syrup:
- 1 cup granulated sugar – Provides sweetness and structure.
- ½ cup water – Dissolves the sugar without making the syrup too thick.
- 1 teaspoon lemon juice – Prevents crystallization and adds brightness.
- 1 tablespoon rosewater – The classic floral note. Orange blossom water also works.
For the kunafa:
- 500g kunafa dough (kataifi phyllo), thawed – The star. Find it frozen in Middle Eastern or Mediterranean stores.
- 200g unsalted butter, melted – Use real butter. Margarine changes the texture and flavor.
- 300g sweet cheese (Akawi, Nabulsi, or mozzarella + ricotta mix) – Akawi is traditional, but a 50/50 mix of whole-milk mozzarella and ricotta works beautifully.
- ¼ cup crushed pistachios (unsalted) – For topping and crunch.
Equipment
- 9-inch round cake pan or shallow baking dish (non-stick or lightly greased)
- Medium saucepan (for syrup)
- Small mixing bowl (for dough + butter)
- Fork or your hands (for breaking up kataifi dough)
- Oven
- Wire cooling rack
- Sharp knife
You don’t need a specialty kunafa pan. Any oven-safe dish with 2-inch sides works fine.
Step-by-Step Instructions
1. Make the syrup first (10 minutes)
In a saucepan, combine 1 cup sugar and ½ cup water. Bring to a boil over medium heat, stirring occasionally. Once boiling, add 1 teaspoon lemon juice and reduce heat to low. Simmer for 8–10 minutes until slightly thickened it should coat the back of a spoon. Remove from heat, stir in 1 tablespoon rosewater, and let cool completely. Do not skip cooling. Warm syrup on cold kunafa = soggy disaster.
2. Preheat and prepare the dough
Preheat your oven to 180°C (350°F).
Take the thawed kunafa dough and place it in a large bowl. Use your fingers to gently separate the long shreds they should feel like loose, dry noodles. Pour 200g melted butter over the dough. Mix with your hands until every strand is coated. The dough will look glossy and smell incredible.
3. Layer the base
Grease your baking pan lightly. Take half of the buttered kunafa dough and press it firmly into the bottom of the pan. Don’t leave gaps. Press it down evenly so it forms a solid, compact layer about 1 cm thick.
4. Add the cheese
If using Akawi cheese, soak it in cold water for an hour first (it’s very salty). Drain and pat dry. Shred or crumble the cheese evenly over the dough layer. Spread it to the edges cheese in the center only leaves you with dry edges.
If using mozzarella + ricotta, mix them together first. The ricotta adds creaminess; the mozzarella gives that famous cheese pull.
5. Top layer
Take the remaining buttered kunafa dough and scatter it over the cheese. Don’t press down hard this time you want a loose, fluffy top layer that will crisp up. Gently pat it flat.
6. Bake
Place the pan in the preheated oven. Bake for 30–35 minutes. Visual cues: The edges will be deep golden brown, and the top will look crisp and slightly darker in spots. You’ll hear the cheese bubbling inside. Texture cue: The center should feel firm when lightly pressed.
7. Pour the syrup
As soon as the kunafa comes out of the oven, pour the cool syrup evenly over the hot pastry. You’ll hear a gentle sizzle that’s the sound of the dough absorbing just enough syrup. Let it rest for 5 minutes.
8. Garnish and serve
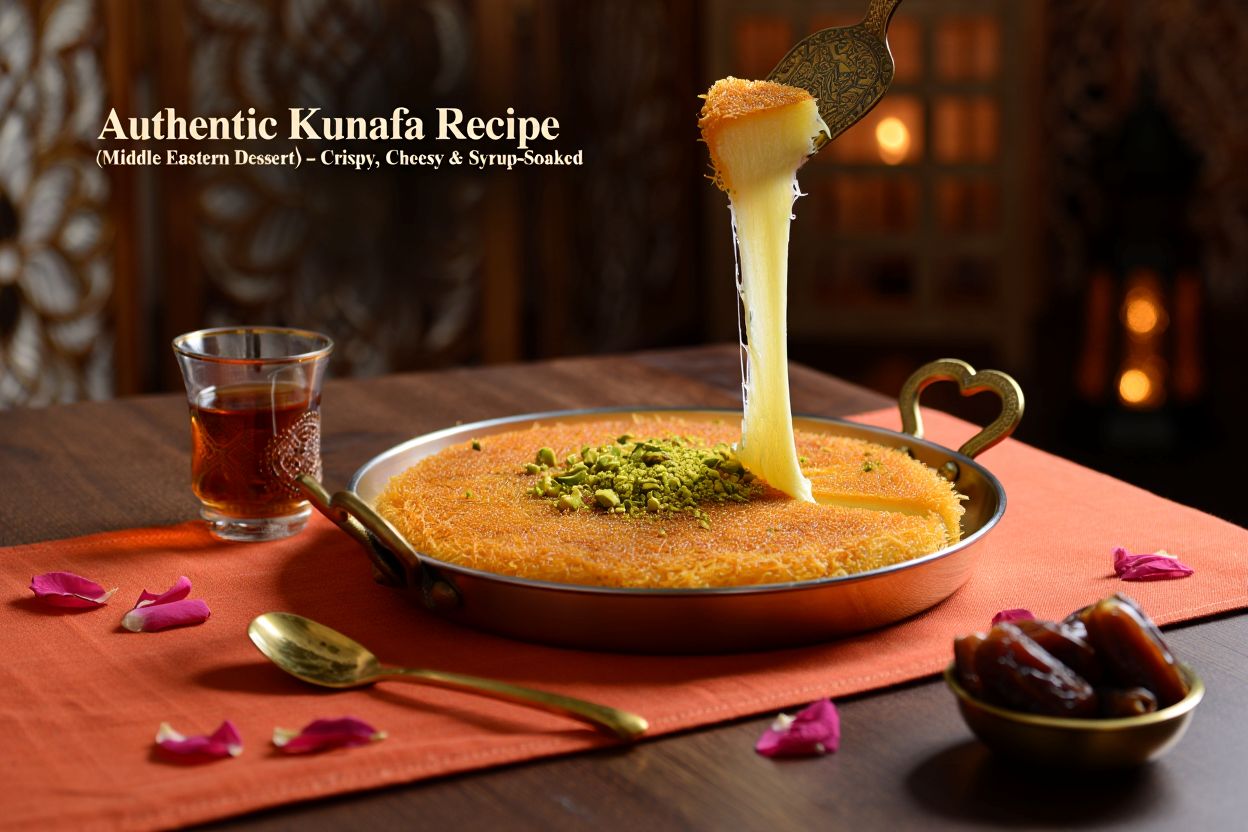
Sprinkle crushed pistachios over the top. Cut into squares or diamonds while still warm. Serve immediately. The cheese should stretch at least 6 inches when you lift a piece.
Pro Tips
- Thaw kataifi dough overnight in the fridge. If you try to separate it frozen, it shatters into dust. Room-temperature dough is easy to work with.
- Use a glass or light-colored metal pan. Dark non-stick pans absorb more heat and can burn the bottom before the top is done. If using dark pans, reduce oven temperature by 10°C.
- Don’t skip the resting time after syrup. Five minutes lets the pastry absorb moisture without turning mushy. Cut too soon and the syrup runs everywhere. Cut too late and the top hardens.
- For extra crunch, broil for 2 minutes at the end. Watch closely broilers turn things from golden to black in seconds.
- Warm your serving plates. Kunafa cools fast. Warm plates keep the cheese stretchy for an extra 10 minutes.
Common Mistakes to Avoid
Mistake #1: Using pre-shredded supermarket mozzarella alone. It’s too dry and rubbery. Mix with ricotta or use a soft brined cheese.
Mistake #2: Pouring hot syrup over hot kunafa. Both hot = oversaturated dough. Syrup must be cool (room temperature) while kunafa is hot out of the oven.
Mistake #3: Pressing the top layer too hard. Compact dough doesn’t crisp. Keep it loose and airy.
Mistake #4: Skipping the lemon in syrup. Sugar syrup crystallizes within 24 hours without an acid. Lemon keeps it smooth.
Mistake #5: Baking straight from the fridge. Cold dough takes longer to brown, leaving the cheese overcooked. Bring dough to room temperature first.
Variations
1. High-protein kunafa
Replace half the cheese with full-fat Greek yogurt or labneh mixed with a beaten egg. The yogurt adds protein and a tangy contrast to the sweet syrup.
2. Vegan kunafa
Use vegan butter and a plant-based cheese that melts (Violife or Miyoko’s mozzarella). Replace the cheese layer with a mixture of mashed ripe banana, shredded coconut, and a tablespoon of cornstarch — surprisingly creamy and sweet.
3. Chocolate-hazelnut twist
Skip the rosewater syrup. Sprinkle ½ cup chopped dark chocolate and ¼ cup toasted hazelnuts over the cheese layer before adding the top dough. Drizzle with hazelnut spread after baking.
4. Saffron & cardamom (Royal Eid version)
Add 3 crushed green cardamom pods and a pinch of saffron threads to the syrup while boiling. Strain before cooling. This is the version served at weddings and Eid feasts.
Storage & Meal Prep
Storage: Keep leftover kunafa in an airtight container in the fridge for up to 3 days. The texture changes the top softens, and the bottom loses crunch. Still delicious, just different.
Reheating: Oven is best. Bake at 160°C (320°F) for 8–10 minutes. Microwave turns it into a sad, chewy puck. Air fryer at 170°C for 4 minutes works beautifully.
Meal prep: Assemble the entire kunafa (without syrup) up to 24 hours ahead. Cover and refrigerate. When ready, bake straight from the fridge add 5–7 minutes to baking time. Syrup can be made 2 weeks ahead and stored in a sealed jar in the fridge.
Freezing: Freeze unbaked, assembled kunafa for up to 2 months. Bake from frozen at 180°C for 45 minutes, then add syrup.
Nutrition Benefits
Kunafa is a celebration dessert, not a health food and that’s fine. But it does offer some benefits.
- Calcium from the cheese supports bone health.
- Healthy fats from unsalted butter and pistachios (monounsaturated fats).
- Rosewater has been used in traditional medicine for mild digestive calming effects.
- Portion control works in your favor: a small 2-inch square is satisfying, so you naturally eat less than you would with a slice of cake.
Enjoy it mindfully. One piece after a meal is tradition, not excess.
FAQ
Can I use shredded phyllo dough instead of kunafa dough?
No. Shredded phyllo (kataifi) is what gives kunafa its signature nest-like texture. Regular phyllo sheets become a different dessert entirely (galaktoboureko). Look for “kataifi dough” in the freezer section.
Why did my kunafa turn out white on top?
Your oven temperature was too low, or you didn’t use enough butter. The top needs direct heat to brown. Move the rack to the middle or upper third of the oven next time.
Can I make this without rosewater?
Yes. Use orange blossom water, vanilla extract (½ teaspoon), or simply omit it. The dessert will still be delicious, just less floral.
Do I have to use sweet cheese?
Sweet, unsalted cheese is ideal. If you only have salty feta or halloumi, soak shredded pieces in cold water for 2 hours, changing the water twice. Then pat dry. The saltiness will be reduced significantly.
My syrup crystallized. What went wrong?
You either didn’t add lemon juice, or you stirred the syrup while it was boiling (which encourages crystals). Next time: add lemon, don’t stir after boiling starts, and wipe down the pan sides with a wet brush.
Conclusion
Kunafa isn’t just a dessert it’s a moment. The moment you pull it from the oven, pour that fragrant syrup over the golden crust, and watch the cheese stretch into long, lazy ribbons. It’s messy, it’s loud, and it’s absolutely worth every minute in the kitchen.
Whether you’re making this for Eid, a dinner party, or a quiet Tuesday night when only something dramatic will do, this recipe will not let you down. Take your time with the syrup, be generous with the butter, and don’t skip the pistachios.
Now go make someone very happy with warm, crispy, syrupy kunafa.
- Baklava Recipe (Walnut & Honey) – Another classic layered pastry with nuts and syrup, perfect for a Middle Eastern dessert spread.
- Traditional Arabic Sweets – A simple DIY guide that pairs perfectly with this kunafa recipe.
- Cheese-Stuffed Sweet Potato– A no-bake, high-protein sweet snack that complements kunafa for Eid dessert tables.